Change Drive Letter
Do you know what Windows drive letter is and how to change a drive letter in a Windows?
You must have seen or noticed, whenever we install the new Microsoft Windows, there is only one drive [C] or other one could be a recovery drive, but the drive letter would not be [D], it must be something else.
What I mean to say is that the drive letters are not in sequence, which doesn’t looks good and sometimes it annoys us.
The steps given below are shown on Windows 10. By the same way you can change drive letters in Windows 7 and 8.1 as well.
In this post, i will show you how you can change drive letters in a Windows 7 or in later Windows like; Windows 10 and Windows 11.
How to Change a Drive in Windows?
However in this example article, our drive letters are in sequence but just to show you how that it works, i will change the hard drive letter to another one.
The below steps are done on a Windows 10 but the same steps will work on other Windows too:
Step 1. Open Disk Management.
There are several ways to open disk management. Check out the two options below:
You can open the disk management utility by using the steps below:
- Right click on This PC on your desktop screen and select Manage.
- The Computer Management box will be on your screen.
- Now click Disk Management under storage on the left side and all drive letters will be there.
- Right click on the Start Button and then choose Disk Management.
Step 2. Disk Management windows will open on your screen.
Right-click on the hard drive for which you want to change the drive letter and select Change Drive Letter and Paths…
Step 3. In the following window, click Change to continue.
Step 4. Now select a new drive letter from the drop down list and click OK.
For instance, i will be changing the drive letter from D to J
Step 5. You should be getting a notification on the screen.
Click Yes to confirm the drive letter change.
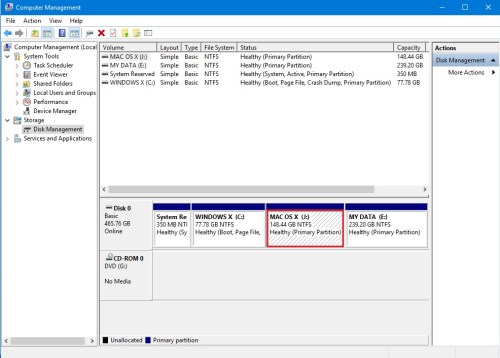
Step 6. Now you can see as on the image below, the drive letter of the selected hard drive has been changed successfully.
Earlier it was a drive letter D and now it is a drive letter J.
 Change Windows Hard Drive Letter Share on X
[Read: Change Hard Drive Partition Name]


