Google 2-Step Verification
Google has a very long list of its services for home and business users. Gmail is one of Google’s most used and free email services over the internet, which also allows you to secure your email’s using Gmail 2-step verification option.
By using Gmail web services, you can send email to any part of the world to any of your friends or family members or you can use it for your business purpose.
For security purposes, Google provides Gmail 2-step verification set up within the account so that the user can prevent their account from any mishappening.
Users are allowed to access and use Gmail on any web browser or can configure to third-party applications like – outlook, thunderbird, etc. using POP or IMAP methods.
Important Note: Before you Proceed
- To use Gmail 2-step verification, always keep your phone number with you at the time of login
- Always keep your phone number up-to-date on your Google account because without a registered number you can’t login to your account
- If you change your number, do not forget to replace the phone number on your Google account with the old number
- Do not share the verification code with anyone
[Read: How to Configure Microsoft Outlook for Gmail?]
When Google launched Gmail service for users, at its initial stage, an individual user received 1 GB of free storage. Currently, an individual user has 15 GB of free storage access from Google.
How do we secure our Google account?
I am sure you must have a Google/Gmail account, but are you sure that your Gmail account is secure enough?
In this digital era, there are many loopholes in this internet world, wherein you might lose your account access anytime. I hope this should not happen to you.
In my opinion, security is better than waiting for any mishappening.
How to Setup Gmail 2-Step Verification?
To prevent Google accounts from any unlikely event, we have an option in Google settings in which we can authenticate Gmail login by using Gmail 2-Step verification method.
If you are a regular user of Gmail and linked to several websites, services, etc. then, secure your Gmail account right now by enabling Gmail two-step verification method.
If two-factor authentication is enabled on your Google account, nobody gets into your account to pass the verification.
Check out the steps below to turn on or off Gmail two-step verification:
Step 1. Launch any of your web browsers (Edge, Internet Explorer, Chrome, Firefox, etc.) and Sign-in to your Google My Account. Login with your existing user ID and password.
Step 2. You will see your Google account personalized dashboard.
- Navigate to the left pane and click on Security
- Now on the right side, you will see options and by default, 2-step verification for a Google account is always off until we turn on
- Click on 2-Step Verification
Step 3. You will be redirected to the next page where you need to click on GET STARTED and on the next screen it will ask you to enter your current password.
Type in your existing Gmail password and click on Next
Step 4. Here, in this place, Google wants to verify your identity by sending a text message or with an automated phone call by which you will receive a code from Google.
Check the listed phone number before you proceed and then, click Next
Note: If choosing the Text message option, make sure you have text message services enabled by your service provider.
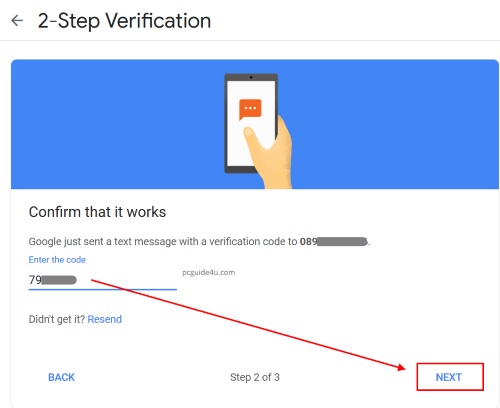
Step 5. Upon checking your registered phone number, you will receive a code if you have selected a text message option from the previous step or an automated call.
Enter that in the box (as shown in the image below) and click Next
Step 6. Finally, you are at the last step, you just need to click on the TURN ON button to continue.
Final Step
Step 7. On this screen, click on the TURN ON button and the 2-step verification method will be turned on for your Google account and for all related services including Gmail.
Lastly, Google will show you a confirmation message that your number is verified and set for verification method.
 In addition, you will receive a confirmation email regarding turning on the 2-step verification.
Now from your next login, you will need to enter the 2-step verification code each time in order to login to your Gmail account.
How to Turn off Gmail 2-Step Verification?
If you feel that you do not require 2-step verification for your Google/Gmail account. You may turn it off anytime by going to the account settings.
Navigate to Google My Account then, reach on Step 7 as above and click on the TURN OFF button.
You may ask for your existing password, enter your password and 2-step authentication will be turned off.
Gmail 2-Step Verification Setup Share on X


