Use System Restore
Many of the computer users don’t know the benefits of restoring the computer. Most of the time they have to reinstall the Windows OS because they were not aware about the restore utility or to use system restore.
Restoration on a Windows computer is a very helpful feature in a Microsoft Windows computer. Many times when our windows get into the problem.
The very first solution that comes to mind is to restore the computer to an earlier date where it was working fine.
Why do we need System Restore?
A system restore is a Windows utility wherein you can restore the computer Windows to an earlier date when it gets into the problem. Doing a restoration will not affect any of your documents, files, music, videos, or any important data that you have saved into the drives or folders.
Restoration will only affect the Windows settings and features but yes, you may have to reinstall the software, if any, that is installed after the restoration date that you have selected.
However, Windows will create its automatic restore point from time to time but its better if you will create a system restore point manually within 15 days of time.
Make sure your system protection settings are enabled in order to do a system restore. You should know how Windows system restore works.
[Read: How to Turn on System Protection in Windows?]
In this article, you will see a step-by-step guide to use system restore in order to get your Windows to an earlier date.
The steps shown below will work properly on Windows 7, 8.1, Windows 10 and Windows 11.
How to Initiate a System Restore?
Follow the steps given below:
Step 1. Press Win + R to open the Run dialog box.
Then type, control and click the OK button. This will open the Windows Control Panel on your screen.
Step 2. Go to the top right, by default, Windows will show you as a Category when you open the Control Panel.
Change the option View by: to Small icons and it will expand all control panel items on the screen.
Step 3. Navigate to System and click on it to open.
This will open the system configuration on your screen.
Step 4. Now, go to the left pane and click on System protection.
Step 5. The System Properties screen will come up. Click on System Restore.
Step 6. You will get the System Restore Window on your screen. Click on the Next button to continue.
Step 7. On the next screen, it will ask you to choose a restore point.
Select one of from the given list in which your computer is running fine and then click Next to continue.
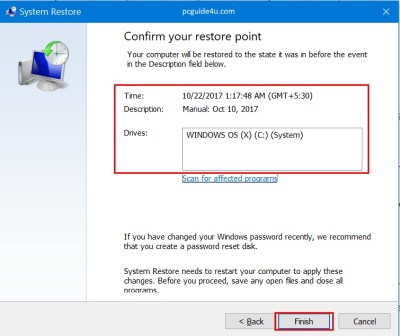
Step 8. Now lastly, it will ask you to confirm the restore point. Please check and confirm, then click on the Finish button to get this done.
Step 9. You will be prompted below:
Once started, System Restore cannot be interrupted. Do you want to continue?
You just need to click on Yes in order to continue.
The moment you click on Yes, the restoration process will start. It may take 5 – 15 minutes to complete the restore depending on the date you have selected.
Confirmation of Successful Restoration
Also, in this process of restoration, your computer will restart automatically and come back once the restore process is completed and show you the message that “The system has been restored to the (date, time)”. Click on the Close button.
So this is the way wherein you can restore your computer to an earlier date and resolve minor & major issues by using this restore utility.
NOTE: If you want to skip the first five steps. Press Win + R to open the Run dialog box. Then type the command rstrui and click the OK button. You will directly reach at Step 6.
Also, do not turn off your computer while the restore process is going on after Step 9.
Use Windows System Restore Share on X


Happy
Great!!