User Account Type in Windows 10
Microsoft provides three types of user accounts in its Windows OS as per user requirements. Followed by: Administrator account, Standard user account, and Guest user account. I am sure many readers will change the user account type on their Windows 10 after reading this post.
The differences between user account types are below:
Administrator Account: Administrator user account has complete access to install and remove software and can make any changes to system settings.
Administrators may be prompted to provide their password for confirmation before being allowed to open as per your given command, and make changes that affect the system and other users too.
Standard User Account: A standard user account can use most of the installed software and change system settings that do not affect other user accounts.
If a Standard account user wants to make any kind of change, which may affect another user account, UAC (user account control) prompted your screen and will ask you to enter Administrator password to get the given command done.
Guest User Account: Basically, the Guest account allows users to access limited features to have temporary access to your Windows OS. If someone is using the Guest user account, cannot install the software or change the settings.
The default guest account cannot be password protected. Windows 10 does not have the ability to add a Guest account.
To learn how to create or add a Guest account on a Windows 10 computer with limited access, follow the link below:
[Read: How to Enable a Guest Account in Windows 10?]
Change User Account Type to Windows 10
What user account type are you using? Meaning, are you in an administrator, standard or guest account? Or do you want to change the user account type to Windows 10?
This article was specifically created to help you change your account type settings in Windows 10.
Follow the steps given below to change the user account type:
Step 1: Open the Windows 10 Settings app. To open Settings, click the Start menu and select the Settings icon.
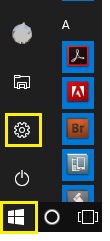
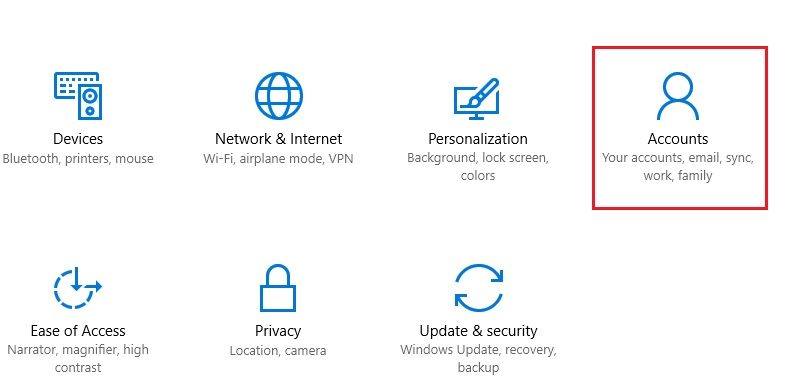
Step 2: Now, click Accounts.
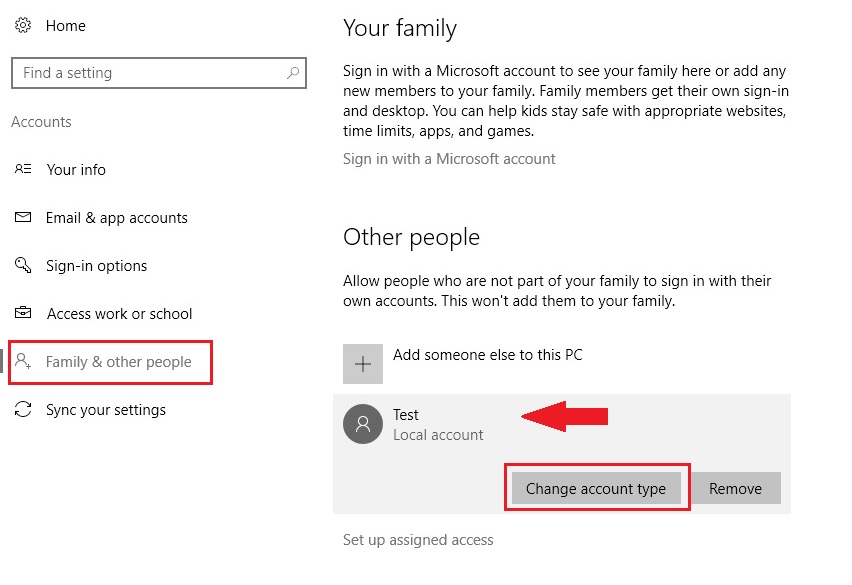
Step 3: On the left side, click on Family & Other people click on an account (i.e.: Test) under Other people or Your family you want to change the type of and click Change account type.
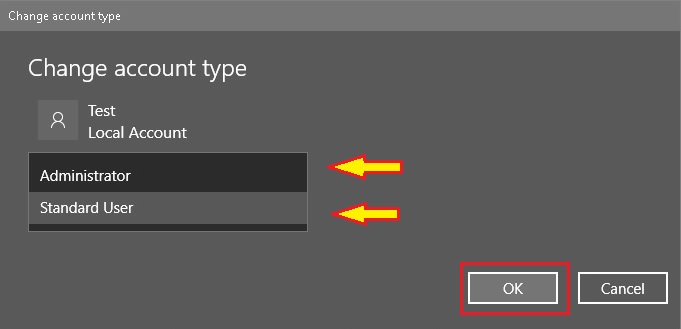
Final Step: Once you are done with the above steps. You will be prompted to select the account type you want to change the account to. Select the account type (Administrator/Standard User) and click on OK.
Great work! You have successfully changed the account type in your Windows 10.
How to Change User Account Type in Windows 10 Share on X