Add Developer Tab in Excel 365 Ribbon
In this article, I will walk you through the step-by-step process how to enable Developer tab in Excel 365 or add developer tab in Excel 365. Whether you are a beginner or a professional working with advanced Excel features, this guide is tailored for you.
If you are working with macros, VBA (Visual Basic for applications), or want to explore form controls in Excel, the Developer tab is your gateway. By default, this tab is not visible in the ribbon. But don’t worry, activating it is quick and easy.
Quick Summary: You can enable the Developer tab from Excel Options by customizing the ribbon.

Scroll down for a detailed tutorial with screenshots and pro tips.
Why Do You Need the Developer Tab in Excel?
The Developer tab in Excel gives you access to powerful tools, including:
- Record and run macros
- Write and edit VBA code
- Insert form controls like buttons, check-boxes, and combo boxes
- Access XML tools and COM Add-ins
- Use ActiveX controls (on Windows)
If you plan to automate Excel tasks or create custom forms, having the Developer tab is essential.
The following steps are applies to:
Excel for Microsoft 365, Outlook for Microsoft 365, PowerPoint for Microsoft 365, Visio Plan 2, Excel 2024, Outlook 2024, PowerPoint 2024, Excel 2021, Outlook 2021, PowerPoint 2021, Visio Professional 2021, Visio Standard 2021, Excel 2019, Outlook 2019, PowerPoint 2019, Visio Professional 2019, Visio Standard 2019, Excel 2016, Outlook 2016, PowerPoint 2016 Visio Professional 2016, Visio Standard 2016
Note: In the new Outlook for Windows, the Developer tab is not available.
How to Enable Developer Tab in Excel 365 (Windows)
Follow the steps below to make the Developer tab appear in your Excel ribbon:
Step 1: Open Excel
Launch Microsoft Excel 365 on your PC. You can use an existing workbook or a new blank sheet.
Step 2: Go to File > Options
- Click the File tab (top-left corner).
- Scroll down and select Options at the bottom-left of the sidebar.
This will open the Excel Options dialog box.

Step 3: Customize the Ribbon
- In the Excel Options window, click Customize Ribbon from the left-hand menu.
- On the right side, under Main Tabs, you’ll see a list of ribbon tabs.
- Check the box labeled Developer.

Step 4: Click OK
Click OK to save the settings.
Now go back to your Excel workbook—you’ll see the Developer tab added to the ribbon at the top!
What to Do After Enabling Developer Tab
Once the Developer tab is active, here are some useful things you can do:
- Record a Macro: Automate repetitive tasks with a few clicks.
- Open the VBA Editor: Press Alt + F11 to access the code editor.
- Insert Form Controls: Create interactive elements like buttons or drop-down menus.
- Enable Macros: Make sure macro settings are adjusted under Trust Center Settings.
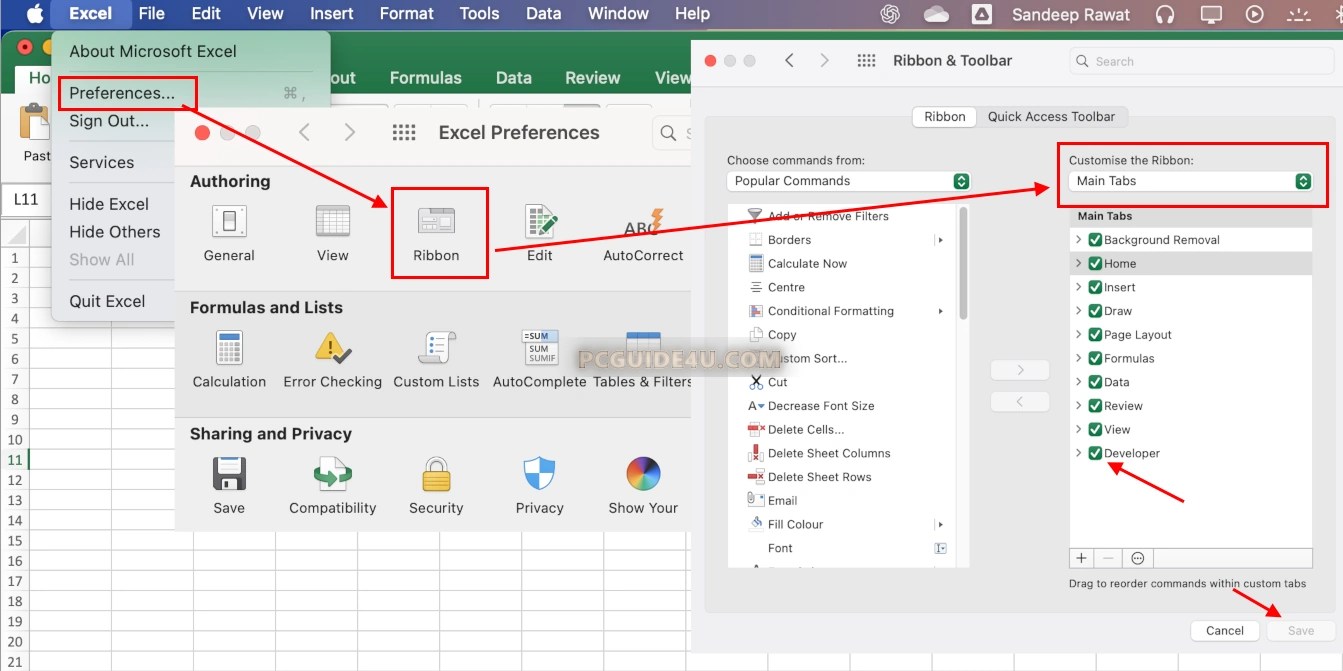
How to Add Developer Tab in Excel 365 (Mac)
Yes, Mac users can also access the Developer tab:
- Click Excel in the top menu.
- Choose Preferences > Ribbon.
- Under the Main Tabs list, check Developer.
- Click Save or OK.
Unlock the Power of Excel
Activating the Developer tab in Excel 365 is the first step to unleashing the full potential of Microsoft Excel. Whether you are managing macros, building interactive forms, or writing custom VBA scripts, this tab is your control panel.
Now that you know how to add the Developer tab in Excel 365, go ahead and explore the advanced tools it offers.
How to Add Developer Tab in Excel 365 Ribbon? Share on X