Control Centre on Mac
If you are new to macOS or simply want to make your daily tasks easier, the Control Centre on Mac is your go-to feature. Introduced with macOS Big Sur and improved in later versions like macOS Monterey, Ventura, macOS Sonoma, and macOS Sequoia – the Control Centre gives you quick access to essential settings – all from a single panel.
In this article, I’ll explain what the Control Centre is, how to open and customize it, and why it can boost your productivity whether you use your Mac for work, school, or entertainment.
What is the Control Centre on Mac?
The Control Centre is a convenient menu that allows you to manage commonly used settings without opening multiple apps or menus. It is similar to the Control Centre on iPhone and iPad, but designed specifically for macOS.
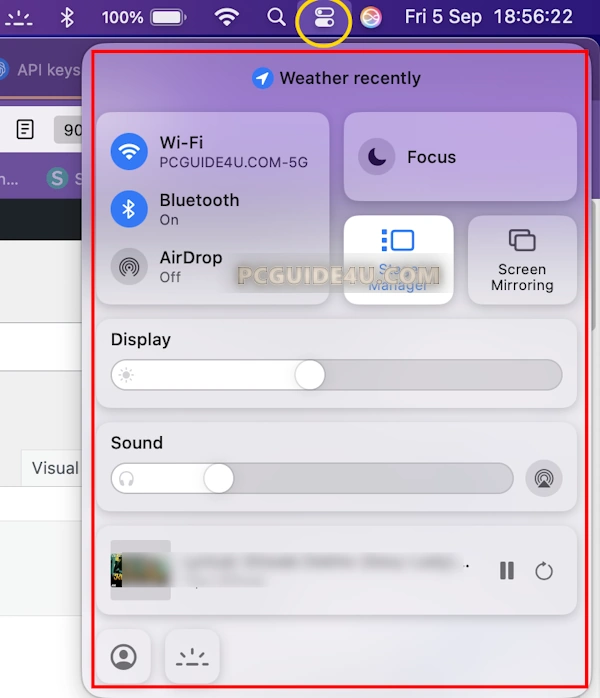
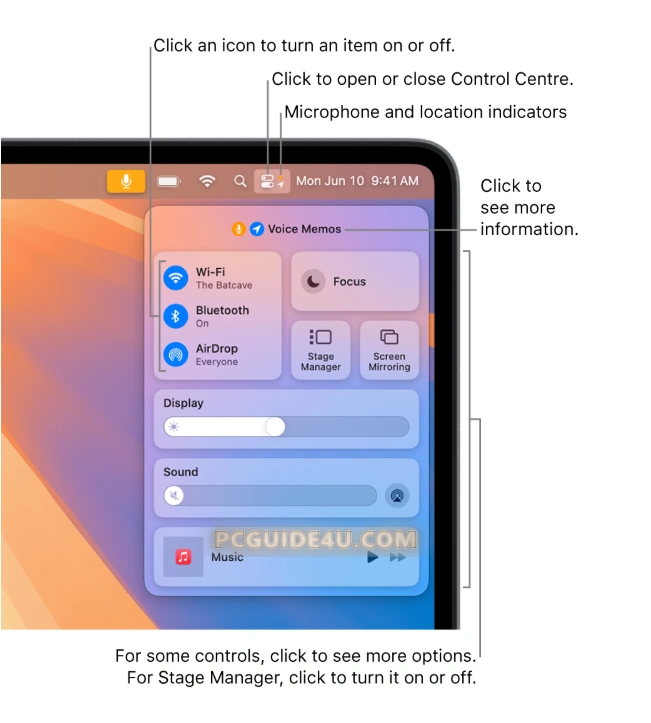
It is located in the menu bar at the top-right corner of your screen, represented by an icon that looks like two stacked switches. Clicking on it opens a panel with grouped settings such as:
- Wi-Fi – Connect to or switch networks.
- Bluetooth – Pair and manage devices like headphones, keyboards, or mice.
- AirDrop – Share files wirelessly between Apple devices.
- Display & Brightness – Adjust brightness, Night Shift, and True Tone.
- Sound – Control volume and select speakers, headphones, or AirPods.
- Now Playing – Manage audio or video playback.
Instead of opening System Settings every time, Control Centre allows you to access these features instantly.
How to Open Control Centre on Mac?
Opening the Control Centre is simple:
- Look at the top-right corner of your screen.
- Find the icon with two stacked toggles.
- Click it to open the Control Centre panel.
From there, you can click any setting to expand or interact with it. For example, clicking Wi-Fi will show available networks.
Privacy Indicators in Control Centre on Mac
Apple has added privacy indicators in macOS to let you know when your camera, microphone, location, or system audio is being used. These indicators appear next to the Control Centre icon in the menu bar at the top-right corner of your screen.
![]()
Here’s what the different symbols mean:
🟠 Orange dot → Your microphone is in use.
🟢 Green dot → Your camera is active.
🟣 Purple dot → Your system audio is being recorded.
➤ Arrow → Your location is currently being used.
👉 Important: Only one dot is shown at a time. For example, if both your camera and microphone are active, you’ll only see the green dot (camera).
Additionally, starting with macOS 13.3 or later, when you open Control Centre, you may also see a privacy field at the top.
This shows which apps are currently using your microphone, camera, location, or system audio. Clicking this field will take you to the Privacy window, where you can view more details and manage permissions.
Why is Control Centre Useful?
The Control Centre is all about convenience and productivity. Here’s why Mac users rely on it daily:
Saves Time
- Adjust brightness, volume, Wi-Fi, or Bluetooth in just a few clicks.
Reduces Distractions
- Quickly enable Do Not Disturb or Focus mode to avoid unwanted notifications.
Improves Workflow
- Easily switch between output devices (like headphones and speakers) or share files via AirDrop.
No Extra Apps Needed
- Many features, such as screen recording and display controls, are built right in.
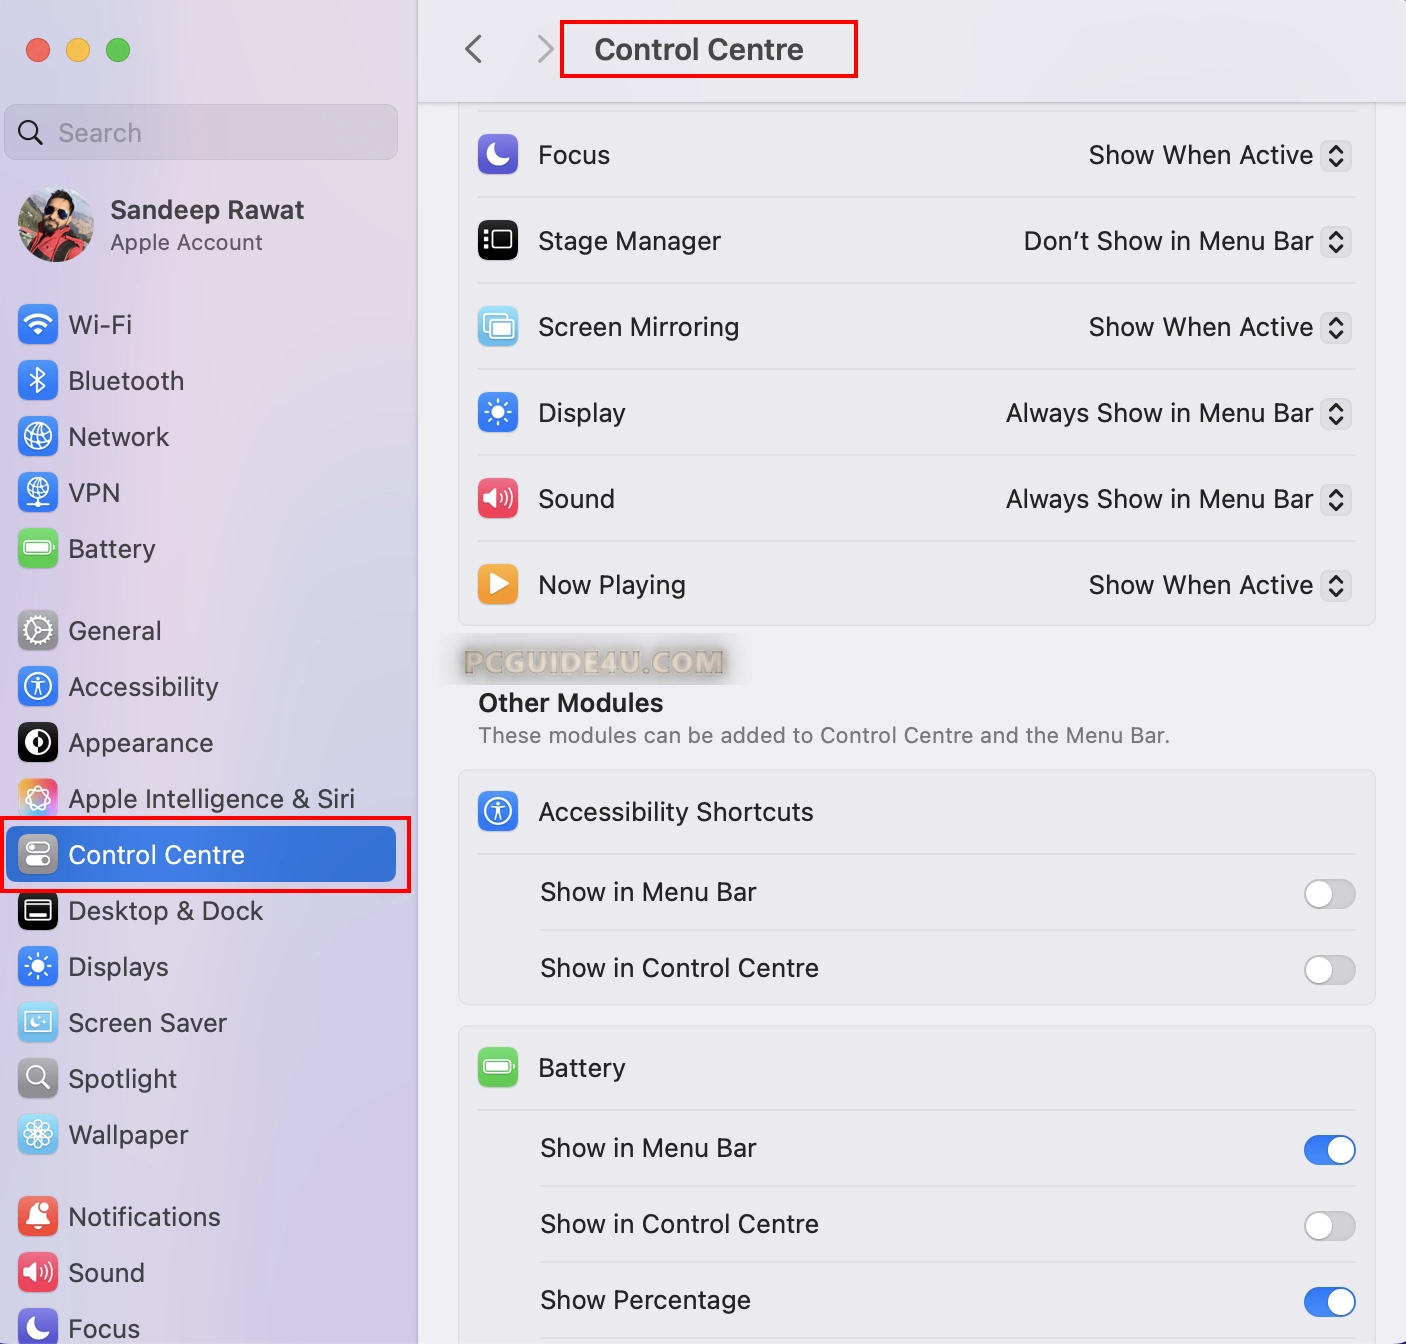
How to Customize Control Centre?
One of the best things about the Control Centre is that you can customize it based on your preferences.
Here’s how to do it:
- Open the Apple Menu (top-left corner).
- Select System Settings (or System Preferences on older macOS versions).
- Click Control Centre from the sidebar.
- Choose which items appear in the Control Centre and which should also show in the menu bar.
Features You Can Access from Control Centre
Wi-Fi and Bluetooth
- Manage wireless connectivity instantly. This is especially useful if you switch between networks often or use wireless accessories like AirPods.
AirDrop
- Send photos, videos, and files to nearby Apple devices quickly. No cables required.
Display Settings
- Adjust brightness, Night Shift (for warmer screen tones at night), and True Tone (for more natural colors).
Sound
- Switch between speakers, headphones, and external audio devices without opening System Settings.
Now Playing
- Control music, podcasts, or videos from apps like Safari, Apple Music, or Spotify.
Screen Mirroring
- Use AirPlay to share your Mac screen on an Apple TV or another device.
Do Not Disturb / Focus
- Avoid interruptions when you need to concentrate on work, study, or entertainment.
Pro Tips for Using Control Centre
Pin Controls to the Menu Bar
- If you use a setting frequently (like Wi-Fi or Sound), add it directly to the menu bar for one-click access.
Use Keyboard Shortcuts
- Some settings, such as screenshots, can be triggered with shortcuts for even faster access.
Keep macOS Updated
- Apple regularly updates Control Centre with new features and improvements.
Expand Features
- Click on each section (like Sound or Wi-Fi) to see more options beyond the basic controls.
Common Use Cases
- During Meetings or Online Classes: Quickly mute sound or enable Do Not Disturb.
- At Work: Switch networks or manage Bluetooth accessories in seconds.
- For Entertainment: Adjust screen brightness and audio output while watching movies.
- For Students: Use screen recording to capture lectures or presentations.
The Control Centre on Mac is one of the most useful features Apple has introduced for macOS. It centralizes your most important settings into one panel, saving you time and making your Mac experience smoother.
Whether you’re adjusting brightness, sharing files via AirDrop, or enabling Focus mode to stay productive, the Control Centre ensures everything you need is just a click away.
Take a few minutes to customize it today—and you’ll notice an immediate boost in convenience and efficiency.
How to Use Control Centre on Mac? Share on X