What is Two-Factor Authentication for Apple ID?
Are you aware of how to setup or enable two-factor authentication for your Apple ID?
Two-factor authentication, also known as 2FA, is an additional layer of security that helps protect your online account beyond just a username and password.
This adds an extra step during the login process, making it more difficult for unauthorized individuals to gain access to your account.
By combining something you know (password) with something you have (a verification code or physical device). 2FA significantly reduces the risk of unauthorised access to your sensitive information.
In terms of security, two-factor authentication is a kind of security that is available for Apple users. Let me explain how two-factor authentication works for an Apple ID.
For instance, if two-factor authentication is turned on for Apple ID. Whenever you login with your Apple ID to any new device (laptop, phone, etc.), Apple will send you an authentication code for verification.
You need to allow it on your mobile device. Once allowed, it will show you a six-digit code that needs to be submitted on the new login device.
The two-factor authentication code will be sent to your registered number with Apple. Following that, Apple will allow you to access your Apple account.
This article will show you the step-by-step guide to enable two-factor authentication for Apple ID.
Check out the image below that shows Apple’s two-factor authentication:

Why do We Enable Two-Factor Authentication for Apple ID? How Does it Work?
As everyone knows, Apple provides high-security features in its devices such as Apple Mac desktops, laptops, iPhones, iPads, etc. all over the world in comparison to other security devices.
We recommend that every Apple user should enable two-factor authentication for Apple devices to secure your personal data (iCloud, iTunes, Photos, etc.).
By any chance, if someone has your Apple ID password and two-factor authentication is enabled for your Apple ID, in that case that person won’t be able to login into your Apple account without an authentication code that makes your Apple ID account protected.
This way, you’ll be notified when someone is attempting to access your Apple account, and you’ll be able to reset your Apple account password as soon as possible.
Though, it’s an optional feature for users if they want to set up two-factor authentication or not.
For individuals who are concerned about their account security, we recommend that you configure or enable two-factor authentication for your Apple ID.
System Requirements to Enable Two-Factor Authentication
The two-factor authentication feature is not enabled on older Apple devices.
So before you start this process to enable two-factor authentication for your Apple ID, make sure you meet the below system requirements for the devices that you use with your Apple ID:
- Mac with OS X El Capitan (version 10.11.5) and should have installed iTunes 12.3 or later
- Apple iPhone, iPad, or iPod touch with iOS 9 or later
- Windows PC with iCloud for Windows and install iTunes 12.3.3 or later
- Apple Watch with watch OS 2 or later
If your device meets the above criteria, proceed with the next steps to configure, set up, or enable two-factor authentication for your Apple ID.
Enable Two-Factor Authentication for Apple ID
In this following article will show you how you can enable Apple ID two-factor authentication using an iPhone, iPad, iPod touch and Mac with OS X El Capitan or later.
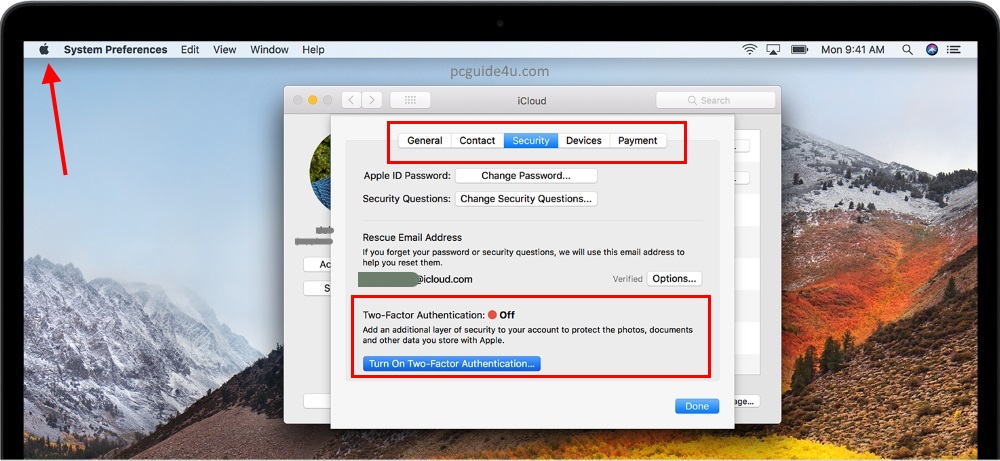
Follow these steps if using an Apple Mac with OS X El Capitan or later:
- Go to the Apple Menu at the top-left of the screen
- Select System Preferences. In the latter version, you will see System Settings
- Then, select iCloud –> Account Details
- Click “Security” –> click Turn on Two-Factor Authentication
Follow the steps below on your iPhone, iPad, or iPod touch to turn on the two-factor authentication for an Apple ID.
Note: While doing this process, Apple might ask you to answer your Apple ID security questions for verification purposes.
a) If you are using an iOS version 10.2 or earlier, follow the steps below on your iPhone, iPad, or iPod touch:
Tap on Settings –> iCloud –> click your Apple ID –> Password & Security –> Tap “Turn on Two-Factor Authentication” –> Tap Continue
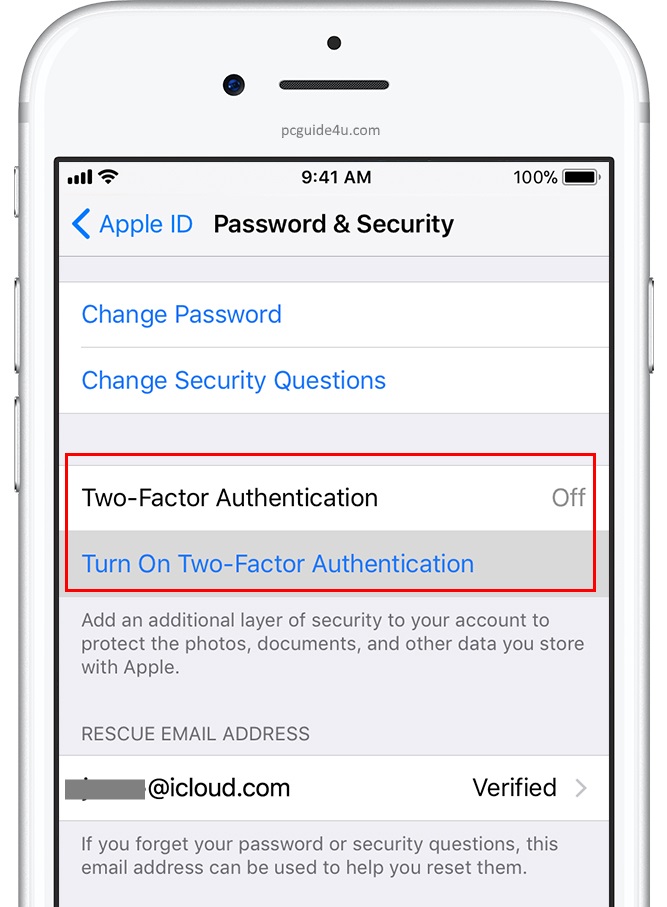
b) If you are using iOS version 10.3 or later, then follow these steps below:
Tap on Settings –> (Your Name) –> Password & Security –> Tap “Turn on Two-Factor Authentication” –> Tap Continue.
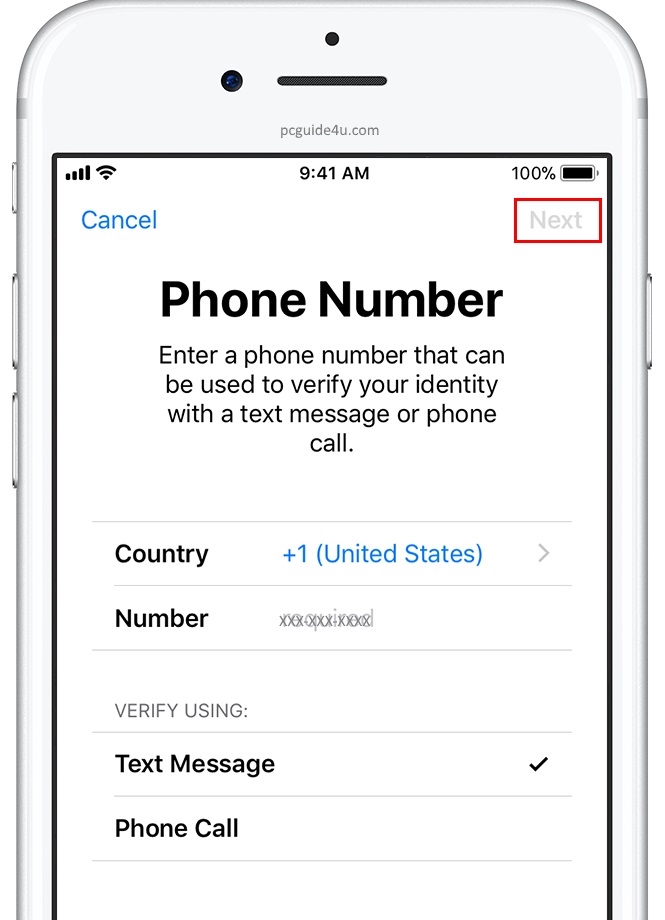
Once you Tap on Continue. It will ask you to enter a phone number where you want to receive future verification codes when you sign-in to any device.
There is an option to choose the verification method (Text message or automated Phone call). Choose the appropriate and click Next.
The moment you tap the next button, Apple sends you a verification code on the phone number you provided.
Once you receive the verification code, submit a verification code to verify your provided phone number and turn it on or enable two-factor authentication for your Apple ID.
Apple ID 2-Factor Authentication Enabled Successfully
By configuring with the above steps, you have successfully enabled two-factor authentication for your Apple account.
Now, whenever you try to login with your Apple ID to any new device, you will be receiving an authentication code from an Apple server for verification. Once you verify the 6-digit code, then Apple will allow you to sign-in to your Apple account.
Congratulations! Your Apple account is now secure.
[Read: How to Cast or Mirror iPhone or iPad Screen To Windows PC?]
Enable Two-Factor Authentication for Apple ID Share on X